How to use Cellpose with Cellprofiler (without plugin)
Cellpose is generalist segmentation algorithm that allows for reliable identification of cells in microscope images even under suboptimal conditions (e.g. bad focus, degenerated cells) and its usage in combination with Cellprofiler enables highly automated analysis of cell/tissue morphology. A plugin allows for direct integration of the two tools and is the most convenient way to build a pipeline, however for various reasons it can be useful to separate segmentation process and analysis.
0) Install Cellpose & Cellprofiler
Before starting, make sure you have python installed. If you lack permission or don’t want to install software on the system you are working on WinPython offers an easy way to run python from a local folder without installation.
Open a PowerShell prompt (when using WinPython run “WinPython Powershell Prompt.exe”) and run the commands below to install Cellpose and it’s optional graphical user interface.
pip install "cellpose"
pip install "cellpose[gui]"
To install Cellprofiler you can either download the installer or run the command below in a PowerShell prompt.
pip install "cellprofiler"
INFO
For this example, I used the, as of this writing, most recent versions of Cellpose 3 and Cellprofiler 4 but future updates might break the exact procedure.
1) Segmentation in Cellpose
To start Cellpose in gui mode run cellpose in a PowerShell prompt. Here you can load single pictures from you dataset and determine the optimal run parameters. You can use the “Calibrate” button after you loaded a picture to determine the average pixel size of your cells. For a more detailed explanation check out the official documentation.
Segmenting all of your pictures using the gui can be cumbersome if your dataset has n>1, so the command below can process an entire folder full of pictures and safe the produced masks as png.
cellpose `
--dir "C:\Users\User\Documents\Cellpose\in" `
--savedir "C:\Users\User\Documents\Cellpose\out" `
--save_png `
--chan 0 `
--diameter 90 `
--pretrained_model cyto3 `
--exclude_on_edges
A short explanation of what the flags achieve, for more details check the documentation:
--dir Choose the folder where your input images are saved
--savedir Choose the folder to which your masks are saved
--save_png Saves the result of the segmentation (=mask) as png file
--chan 0 Uses the grey channel for segmentation
--diameter Choose the average diameter of your cells in pixel (can be determined in the gui)
--pretrained_model cyto3 Selects the model to use for segmentation, tweak as necessary
--eclude_on_edges Makes sure cells on the edge of the image aren’t segmented
If you have a gpu I recommend you add --use_gpu to significantly speed up the segmentation.
2) Analysis in Cellprofiler
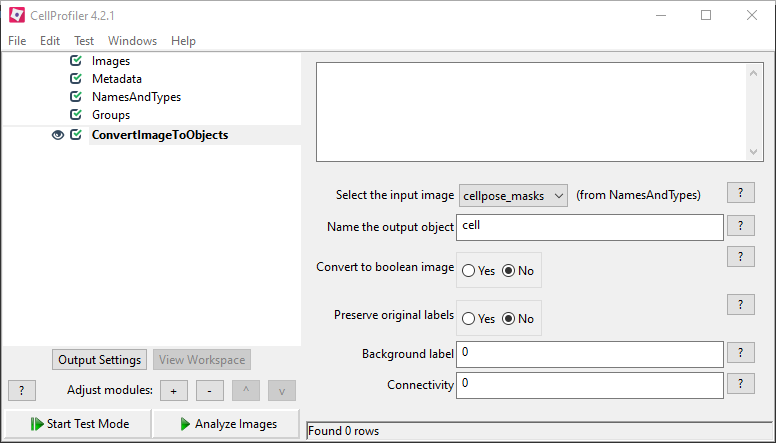
The generated masks can be used in cellprofiler to detect the segmented cells as individual objects. To achieve this, assign your masks in “Images” and “NamesAndTypes” and use the “ConvertImageToObjects” module in your pipeline, select the cellpose masks as input, name your output objects and select “No” on “Convert to boolean image”

You can then use the objects in other modules such as “MeasureObjectSizeShape”.
Enjoy Reading This Article?
Here are some more articles you might like to read next: